
I know firsthand that bathroom renovations can be expensive, and the thought of tackling one can feel overwhelming. Maybe you're dreaming of a full remodel down the road, but for now, you just want a refresh—something simple, affordable, and effective. If that sounds like you, then this post is exactly what you need! With just $350, I completely transformed my bathroom, making it feel brand new without the cost and hassle of a full renovation. Here’s exactly what I did to achieve a $350 DIY bathroom makeover on a budget and how you can do it too!
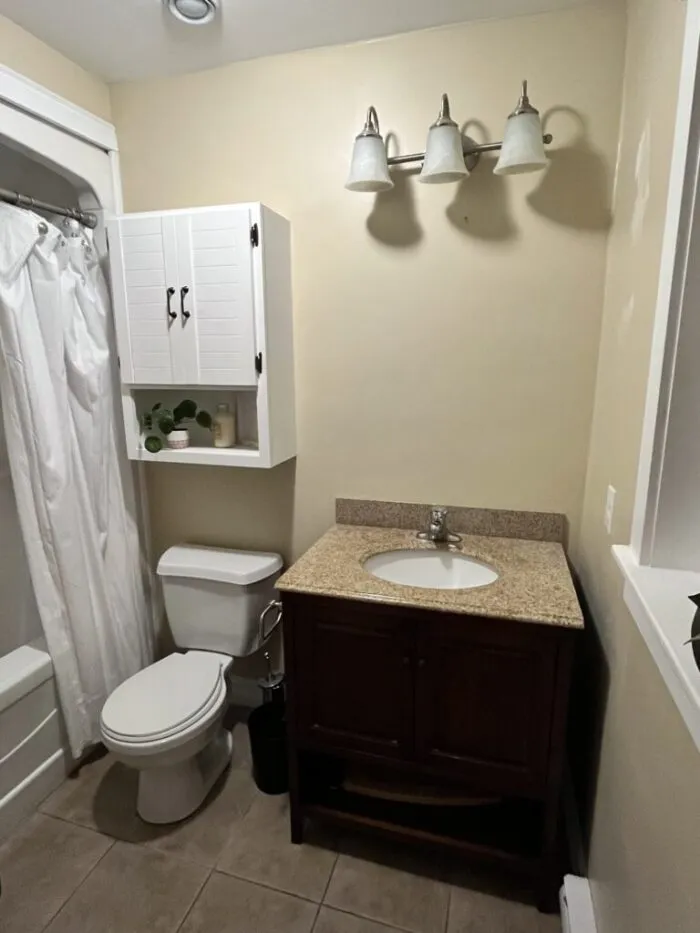
Here is a photo of the before of this DIY bathroom makeover on a budget!
add wallpaper to add character
One of the easiest ways to make a big impact in a small bathroom is with wallpaper. I chose a bold yet subtle pattern for the back wall to create a focal point, instantly adding to the space. If you’re hesitant about commitment, peel-and-stick wallpaper is a great option—it’s removable and perfect for renters or anyone who likes to switch things up. It is also really easy to apply!
How to Apply Peel and Stick Wallpaper:
- Start with a clean, smooth wall surface. Wipe it down to remove dust and debris. You may need to take sandpaper to remove any sharp or rough edges
- Measure and cut your wallpaper to fit the height of your wall, leaving a little extra at the top and bottom for adjustments.
- Peel off a small section of the backing and start applying from the top, smoothing it out with a putty kniffe works great. Ensure your first piece is level!
- Continue peeling and sticking as you work your way down, trimming excess with a sharp utility knife.
painted the countertop
Instead of replacing the vanity with this DIY bathroom makeover on a budget, which would have been a major expense, I used Rust-Oleum Appliance Paint to paint my granite countertop white. This was by far one of the most transformative steps! The dark brown, dated granite suddenly looked clean, fresh, and modern. I feel like it completely changed the wood tone of the vanity! This product literally makes the surface feel like the finish of a fridge.

How to Paint Your Countertop:
- Lightly sand the surface with 220-grit sandpaper to help the paint adhere.
- Clean thoroughly with a degreaser to remove any oils or residue.
- Use a foam roller for an even application, applying multiple thin coats rather than one thick one.
- Let it cure fully before placing anything on it—this is key to long-lasting results!
spray painted the hardware and faucet
Since I wanted a modern black look without buying a new faucet, I spray-painted the existing one black, along with the cabinet hardware. This was a super affordable way to get the look I wanted. However, I’ll be honest—the paint did start to chip over time on the faucet. If you want a lasting finish, I’d recommend replacing the faucet instead which can be done fairly cheap!
How to Spray Paint Fixtures:
- Lightly sand the surface to create texture for the paint to grip.
- Clean thoroughly and dry completely.
- Use a primer and then spray paint or you can purchase a two in one for durability.
- Apply multiple light coats, allowing drying time in between. to avoid drip marks
- Seal with a clear protective topcoat to help prevent chipping.
updated the mirror and light fixture
Replacing a dated mirror and light fixture can make a huge difference. I swapped out my old mirror for a sleek, modern mirror that better suited the space. Then, I replaced the outdated light fixture with a more stylish and functional one that improved both the aesthetics and brightness of the room. I replaced the one above the vanity and the ceiling light - both incredibly affordable!
Pro tip: If your existing light fixture is still functional but outdated, consider spray painting it for a budget-friendly update!
The light fixtured I purchased at IKEA but was gold so I spray painted the base black to match the rest of the bathroom!
diy floating shelf
Adding shelves doesn’t have to be expensive! I bought a 1x6x8 board from my local hardware store, cut it to my prefered size, and used simple brackets to create a floating shelf above the toilet. These are perfect for extra storage or decorative touches like candles, plants, or rolled-up towels.
Steps to Install Floating Shelves:
- Measure and cut the board to your desired shelf length.
- Sand and stain (or paint) the wood for a finished look.
- Use a level to mark where the brackets will go.
- Secure the brackets to the wall using anchors if needed.
- Attach the shelves to the brackets and style them with decor!
cost breakdown: diy bathroom makeover on a budget
Here is a total breakdown of the cost for this DIY bathroom makeover on a budget. Keep in mind this was done in 2023 and the prices are in CAD. However, I will have everything linked below for my Canadian and American friends!
I renovated two bathrooms at the time so there is an adjustment for cost on a few of these items to reflect what was used for this bathroom.
- Vanity light fixture $39.99 Amazon
- Ceiling light $34.99 Ikea
- Spray paint black all in one primer $16.99 Canadian Tire
- Top coat $14.99 Canadian tire used for other bathroom as well
- Appliance epoxy paint $42.95 Home Depot used for other bathroom as well
- Hinges for shelf (already had)
- Wood for shelf (already had)
- Stain for shelf $18 Home Depot used for other bathroom as well
- Mirror $49.99
- Wall paper $54.99 a roll x 2 Home Depot
- Light bulbs (6 pack) $30 Home Depot half were used for other bathroom
Total cost for bathroom & $411.56
Adjusted cost $350.65 CAD
See below shoppable links to everything used in this project. The only thing not linkable was the IKEA light (linked above).

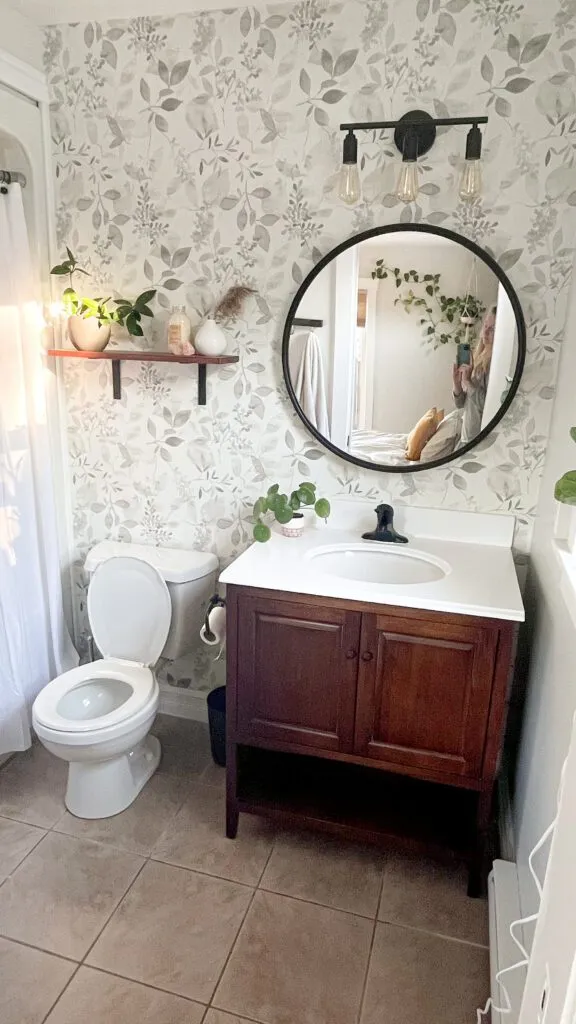
end results of this diy bathroom makeover on a budget
For just $350, my DIY bathroom makeover on a budget went from dated and dull to modern and stylish. Every change was simple to do but made such a big impact! If you’re looking for a quick, affordable way to refresh your bathroom while keeping future renovations in mind, these updates are the perfect solution.
Would you try any of these in your own bathroom? Let me know your favorite budget-friendly updates!
Check out this video from behind the scenes of the process!
If you found this tutorial helpful, don’t forget to pin it for later and subscribe to my email list for more DIY projects and home decorating tips!
Looking for more inspiration? Check out this kitchen renovation for only $1,600 - a wild transformation! Update My Kitchen Without Replacing Cabinets On A Budget