
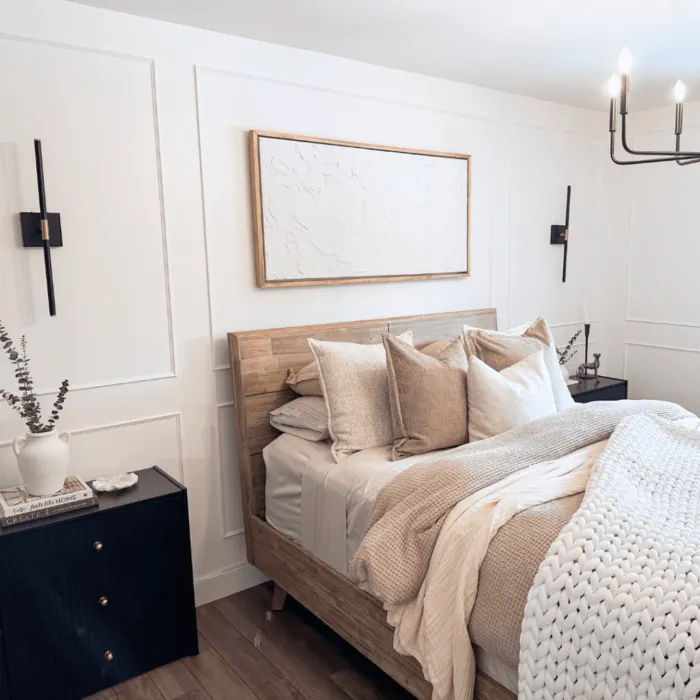
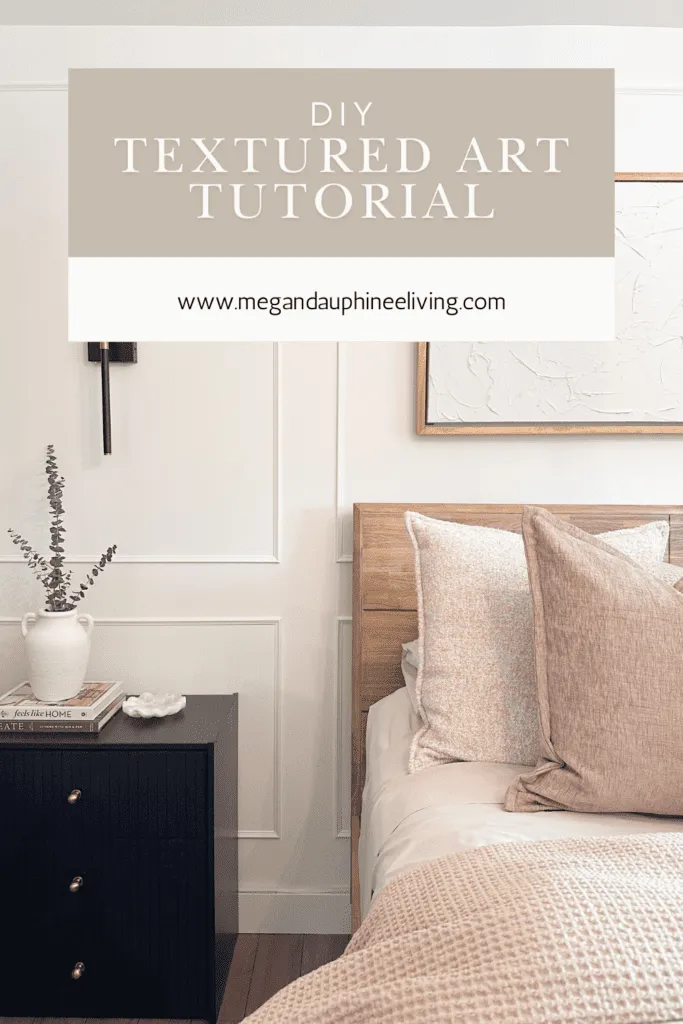
I love finding ways to DIY decor pieces for a fraction of the cost. When I saw textured art wall hangings at HomeSense for $200, I knew I could create something just as beautiful for way less. So, for just $40, I made my own large-scale, DIY textured art using drywall mud, a canvas, and some 1x2x8 boards for a floating frame. Here’s how you can do it too!
I also answer some common questions when it comes to making a DIY textured canvas wall art and floating frame at the end of this blog post!

Materials Needed for DIY Textured art:
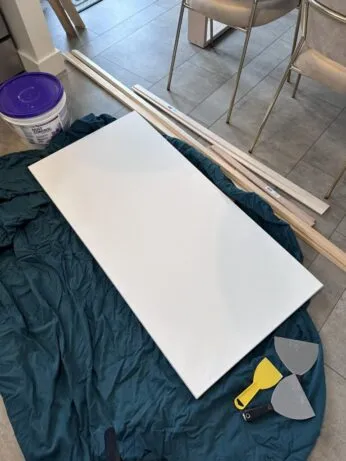
- 24x48 inch canvas
- Drywall mud
- Putty knife (the kind used for patching walls)
- 1x2x8 boards x 2 (for the frame)
- Miter saw
- Gorilla glue
- Nail gun with 1-inch nails
- 1/4 inch x 2-inch x 24-inch wood pieces x 2
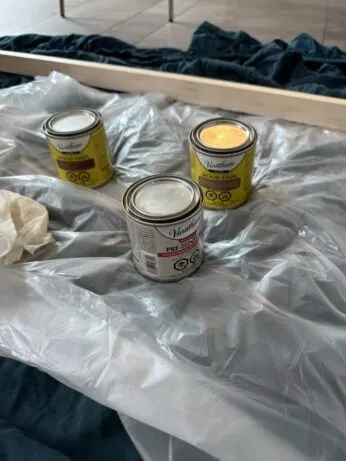
- Wood stain (Weathered Oak + Early American is what I used)
- Wood conditioner
- 220-grit sandpaper
cost
I already had everything other than the wood for the frame and the canvas. I paid $24 CAD for the Canvas from HomeSense and $15 for the wood for the frame. If you need to buy additional materials mentioned above you will need to factor that into your cost.
video instructions
If you learn better with video instructions check out my YouTube video here!
Steps to making art and frame
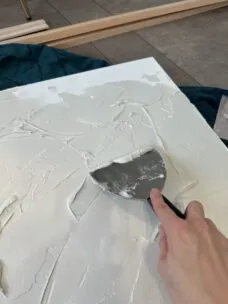
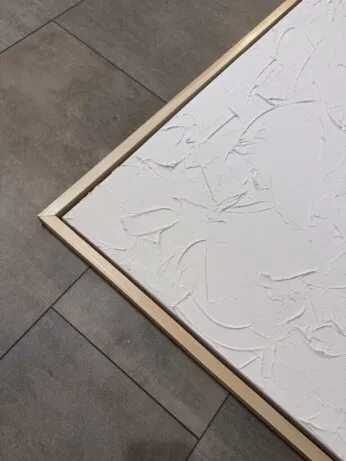
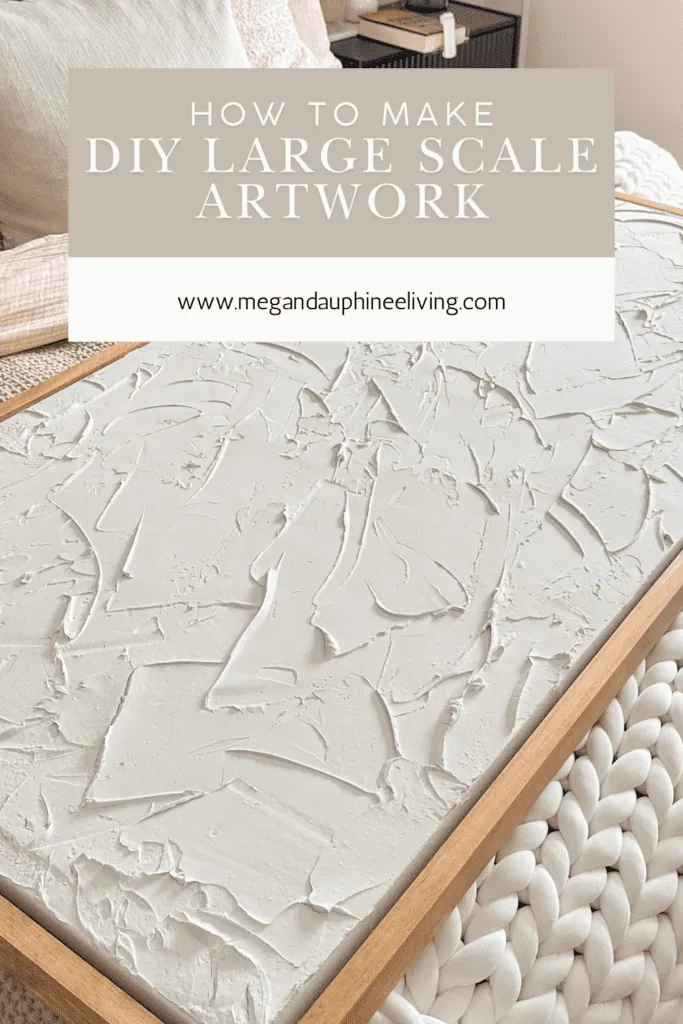
Step 1: Creating the Textured Canvas
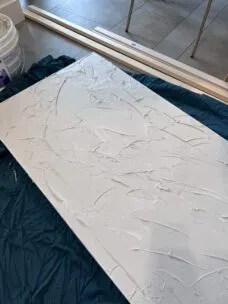
This part is where you can really let your creativity shine! Take your putty knife and start spreading drywall mud over the canvas. I went for an abstract look with no real plan—just making sure I didn’t apply it too thick or too thin. You want enough texture for depth but not so little that the canvas peeks through.
Once you’re happy with the texture, let it dry. Mine took almost two full days because some areas were a bit thicker.

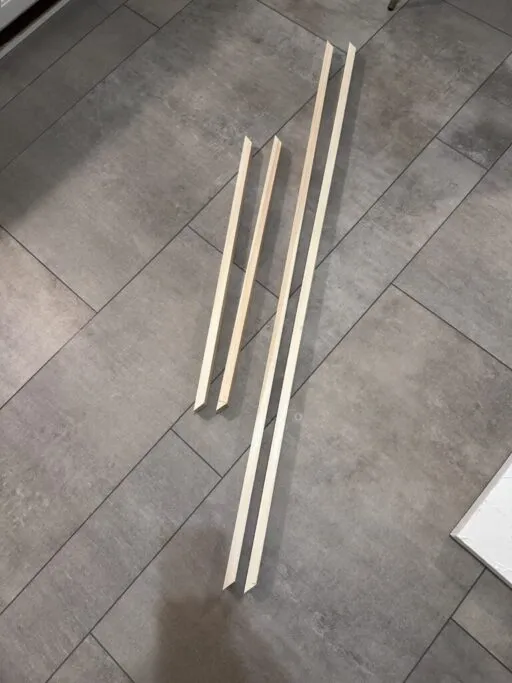
Step 2: Deciding on the Floating Frame
A floating frame gives this piece a more high-end look. After researching, I found that most floating frames have a 1/8 to 1/4 inch gap around the canvas. I went with a 1/4 inch gap, which meant my frame measurements needed to be:
- Height: 24 inches (canvas height) + 0.5 inch (1/4 inch on each side) = 24.5 inches
- Width: 48 inches (canvas width) + 0.5 inch = 48.5 inches
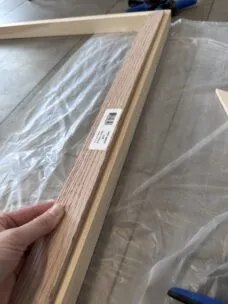
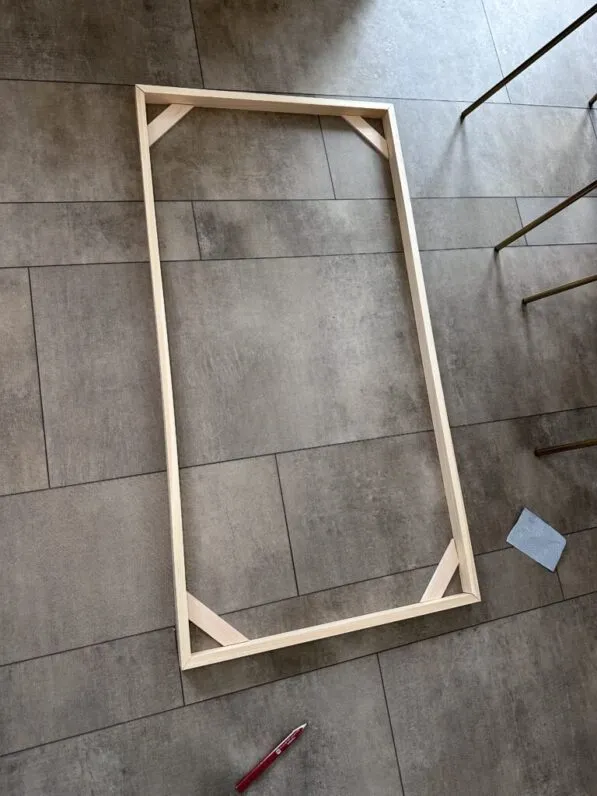
Using my miter saw, I cut my 1x2x8 boards at a 45-degree angle, making sure the measured line was on the inside of the angled cut for a clean fit. So that means the inner corner lines up at the measurements I made above.
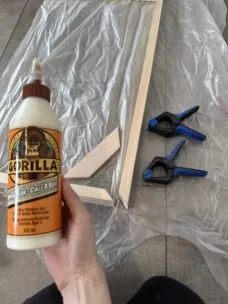
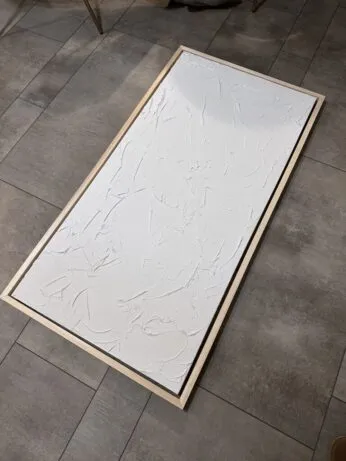
Step 3: Assembling the Frame for diy textured art
With the pieces cut, I used Gorilla Glue and my nail gun to attach the frame. My husband helped hold everything in place while I nailed it together. I only used 8 nails in total, driving them in from the top and bottom at the corners to keep the sides hole-free. If you have stainable wood filler, you can fill any nail holes before staining, but I skipped this step since they were barely noticeable.
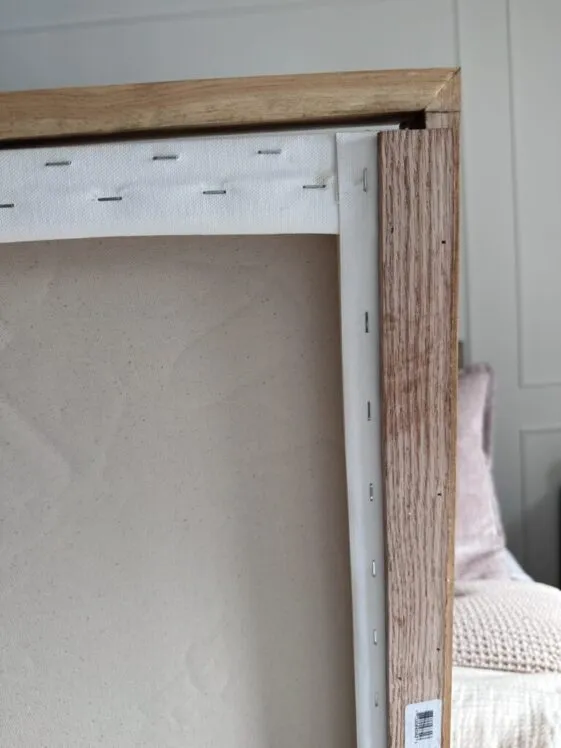
Where this is a floating frame I needed to figure out how I would secure the frame to the canvas. So, I used small 1/4 inch by 2-inch by 24-inch wood pieces from Home Depot. From there, I nailed these to the back of the frame (4 nails on each side), which allowed me to attach the canvas without extra nail holes on the front.
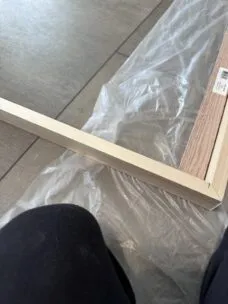
I had considered other methods I saw online—like gluing little pieces inside the frame—but I was worried about durability, the weight of the canvas, and unwanted nail holes. I considered securing these to the back of the frame but I didn't want to see them when hung on the wall from the side and I felt it would look messy. See below what I mean:
The method I went with kept everything looking seamless and professional! Plus, I feel it is more sturdy given the weight of the canvas and my DIY textured art.
Step 4: Sanding and Staining
Once the frame was fully assembled, I sanded it down with 220-grit sandpaper for a smooth finish. Next, I applied wood conditioner to ensure an even stain application. For the stain, I layered Weathered Oak and Early American to get a warm, rich color that complemented my space.

After the stain dried to my liking, I attached the canvas to the frame by nailing a few nails on each side of the back of the canvas into the 1/4 inch pieces with my nail gun. To ensure my canvas was perfectly centered I used a couple of deck of cards to wedge inbetween the frame and canvas creating a tight fit on all four sides. Once it looked centered, I flipped the piece upright, and used my nail gun to secure the canvas to the frame.
Step 5: Hanging diy textured art
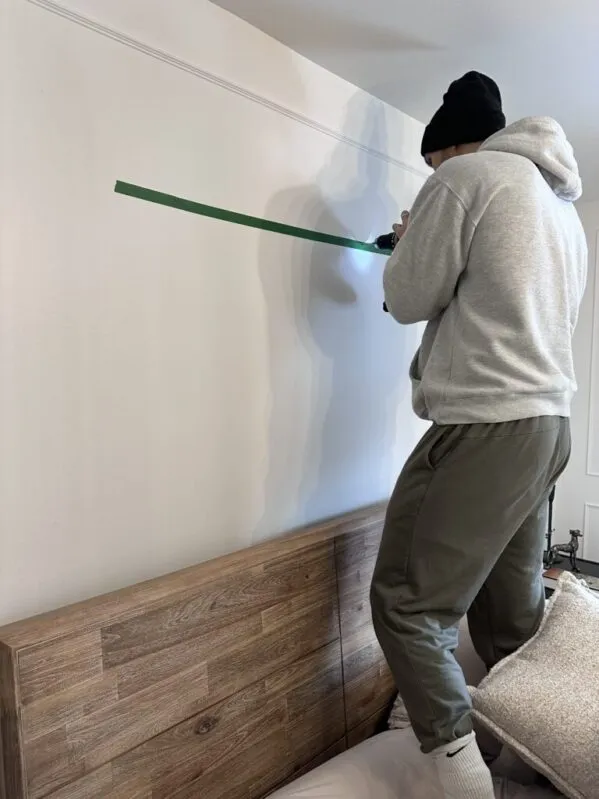
Now it was time to hang it above my bed. So, I decided what height I wanted it to hang (remember, don't hang artwork too high. You should hang your artwork anywhere from 6-8 inches above your headboard. I hung mine 7.5 inches above it. I screwed a few screws with anchors into the wall to rest the DIY textured art on. Use a level to ensuring they are level.
Tip: I love using painters tape when I am hanging anything up! You can mark measurements like your center point, etc, without marking up your walls!
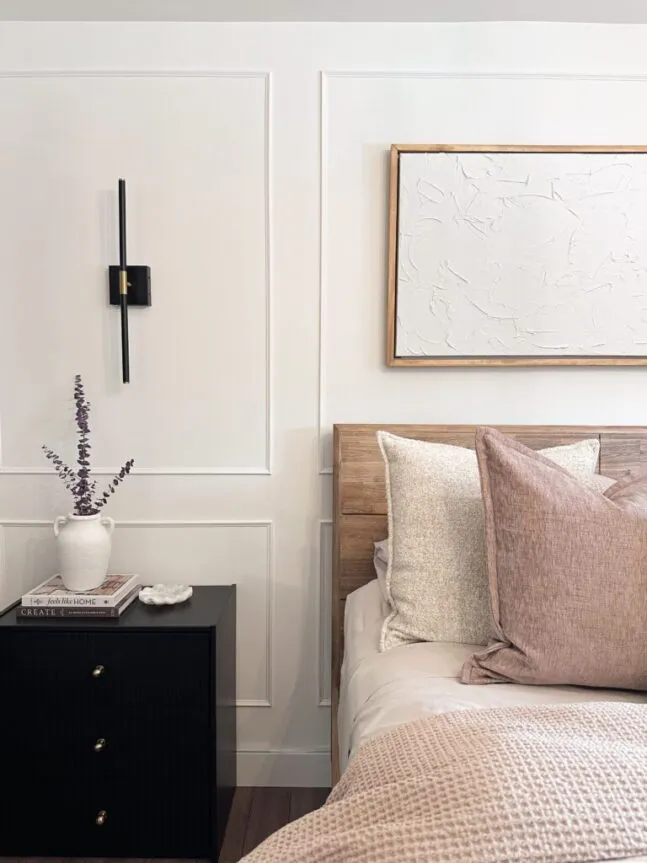
And just like that—voilà! I had my very own DIY textured art wall hanging that looked just as good (if not better!) than the $200 version from HomeSense. The best part? It only cost me $40 to make and I made it! How cool?
common questions for making diy textured art
What’s the best type of canvas to use for textured art?
When working with texture, a sturdy, pre-stretched canvas or a wood panel works best. Thin canvases can warp under the weight of texture mediums, so opt for heavy-duty canvases for the best results. You can also thrift a canvas or framed art from a thrift store or somewhere cheap like IKEA!
Can I mix different texture mediums together?
Yes, but with caution! Some mediums (like joint compound and acrylic gel) don’t always mix well and can lead to cracking or peeling. If you’re combining materials, test a small batch first. A safe bet is to mix within the same product family—like blending modeling paste with acrylic gel medium—to keep consistency smooth and adhesion strong.
How do I make my texture look intentional rather than messy?
The key is layering and movement. Avoid overworking the texture—once you make a mark with a palette knife, let it be! Experiment with different tools like palette knives, sponges, or even your fingers to create depth. Also, step back and look at your piece from a distance before adding more. Sometimes, less is more!
What tools work best for applying texture?
Your best friends for texture are palette knives, trowels, and brushes. I've even used a damp spongue! Each tool gives a different effect—palette knives create sharp edges and peaks, while brushes and sponges soften the look.
What type of wood should I use for the frame?
Pine, poplar, or oak are great choices! Pine is budget-friendly, poplar has a smooth finish, and oak will give a more high-end look. Choose wood that is straight and free of knots to ensure a clean look. I used the cheap stuff!
Should I stain or paint the frame? How do I choose a finish?
This depends on your style! If you want a modern, minimalist look, a painted frame (white, black, or a bold color) works well. For a natural or rustic vibe, stain enhances the wood grain. Try holding sample stains or paint swatches next to your artwork to see what complements it best.
How do I attach the frame without damaging the canvas?
For a simple flush frame, you can attach it directly to the canvas frame using brad nails or a staple gun (nailing from the back). For a floating frame look, use small wooden spacers OR a deck of cards (this is what I used) between the canvas and the frame to ensure it is even all the way around before securing. I stood it up and secured it with the nail gun. I do not recommend laying face down!
What’s the best way to hang the finished piece securely?
You can do this a few ways. You can just put screws or nails in the wall depending how heavy your artwork is and hang it off them. Or, you can use D-rings with picture-hanging wire are the most secure option. Attach the D-rings to the back of the frame about ⅓ of the way down to keep the artwork balanced when hung. For heavier pieces, two anchor hooks for extra stability.
conclusion to textured canvas art
This DIY project is an easy and cost-effective way to create large-scale art for your home. I truly think anyone can make these and there are so many ways you can go about it. Tap into your creativity and give it a try. Whether large or small, it will be a unique addtion to your home!

Don’t let this project slip off your radar—pin it now so you’ll have it when inspiration strikes! And if you love DIY projects that are budget-friendly and actually doable, join my email list for exclusive tips, step-by-step guides, and ideas to make your house feel a home you are proud of.
Check out my tutorial on the box molding featured in this bedroom: Beautiful Easy DIY Wall Molding: How To Plan, Measure, & Install