
Painting over painted kitchen cabinets and not sure where to start? Let me show you how to renovate a kitchen you'll love! Creating the kitchen of your dreams doesn’t have to come with a $40,000 price tag. If you’ve spent hours scrolling through Pinterest and Instagram, longing for those stunning kitchens, I’m here to tell you it’s possible to get that look on a budget!
You might be asking yourself, how can I renovate my kitchen on a tight budget? Especially if my cabinets have already been painted and are chipping away? What are the cheapest ways to update a kitchen? Is it worth painting old kitchen cabinets? How much does it cost to paint a kitchen? Can I renovate my kitchen myself?
With some determination, hard work, and a little creativity, you can renovate a kitchen you'll love—without breaking the bank.
To date, I’ve renovated three kitchens without replacing a single cabinet, each costing a fraction of a full remodel:
- $1,600 CAD
- $1,800 CAD
- This latest one, just under $3,000 CAD
The biggest cost savings came from working with my existing cabinets. In this post I will walk you step-by-step through my most recent renovation, proving that with a bit of effort, you can achieve amazing results, even with little to no DIY experience. I will also answer common questions when it comes to renovating your kitchen without replacing your cabinets.
So let's get into it!
the planning
For this kitchen renovation I knew I wanted to brighten it up and make it look like a modern day kitchen. With this kitchen, I tackled new projects and went further than my previous kitchen renovations which is why this one was more expensive than the previous two. To make this a cost-effective project, I decided I was going to work with the existing original cabinets from the 70's. They were previously painted (about 10 years ago) but the paint was chipping and flaking off. So you may be asking yourself, can I paint over painted kitchen cabinets? The answer is yes!
The hinges were starting to rust and the hardware was outdated - both needed to be updated. I decided I wanted to upgrade the hinges to hidden hinges for a more modern and sleek look even though this would add a bit of work and a slight cost incrase.
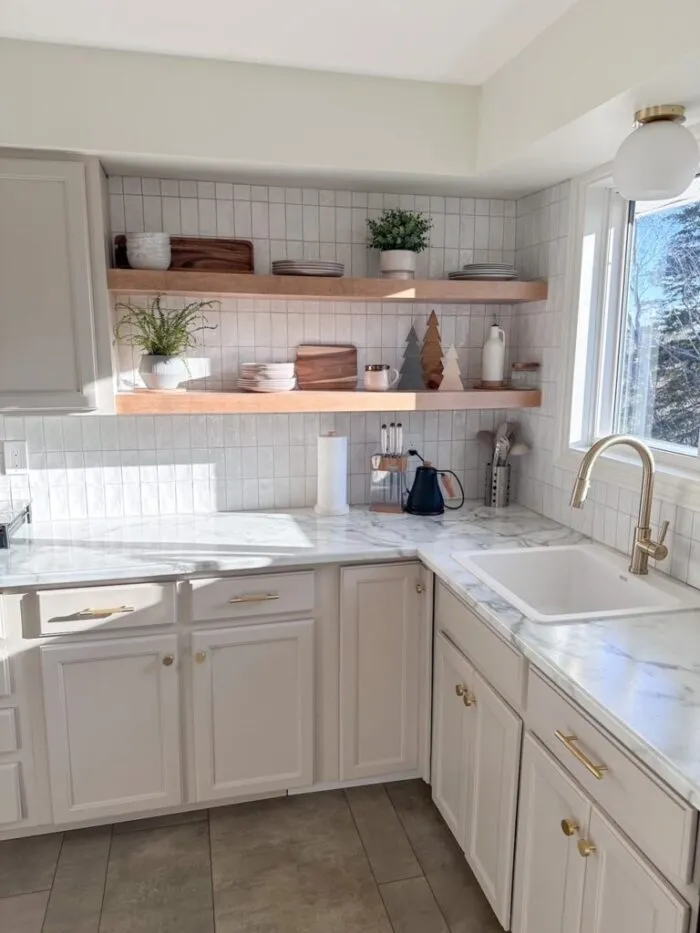
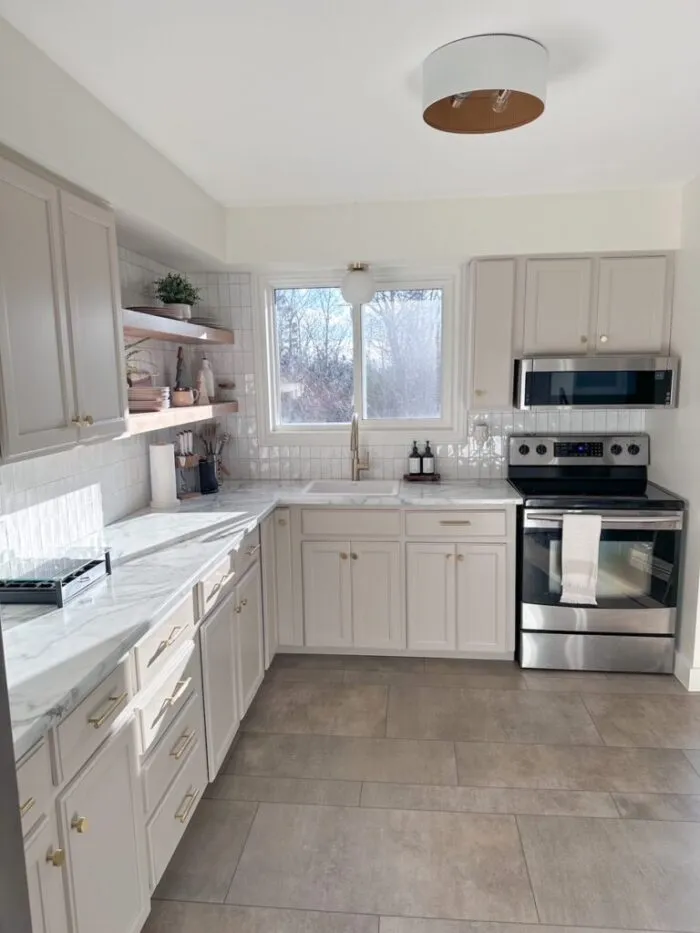
The backsplash was a peel and stick and I wanted to upgrade it to a stone tile. The sink and faucet were old, the facuet was starting to leak, there was water damage to the countertop around the sink- I knew this all had to go and be upgraded. I also wanted to add floating shelves. This kitchen had a lot of dark finishes and I wanted to really brighten things up as this kitchen has minimal natural light and is north facing so it only gets sunlight in the morning.
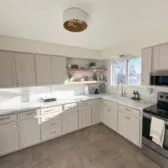
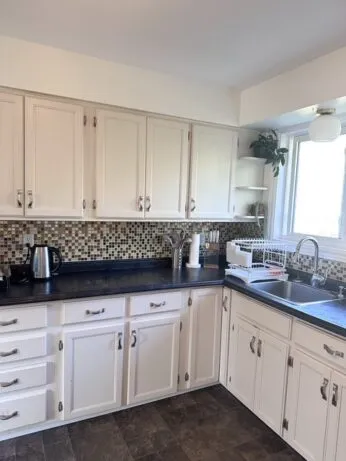
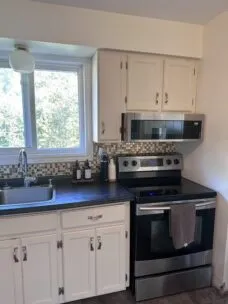
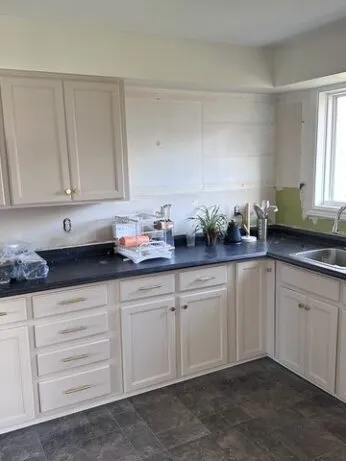
Before photos
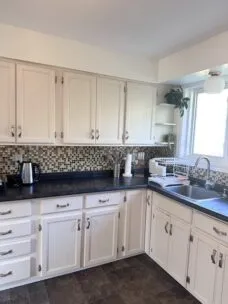
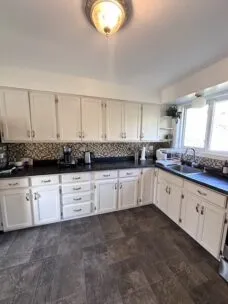
After photo

tools used for project
- Painting supplies (tape, trays, roller, brush)
- Sanding paper, wood filler
- Drill
- Screwdriver
- Utility Knife
- Templates for hardware and hinges
- Laser Level (or regular level)
- Tile Cutter
- Tiling Supplies
- Jig Saw
For a complete list of links for all of the products used in this project I have compiled a page of resources with all of the links. Click here for all of the information!
step 1: preparation
prep for painting over painted kitchen cabinets
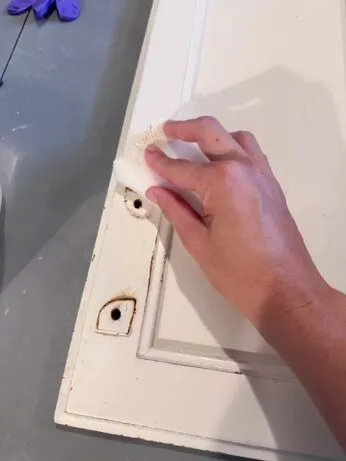
You may be asking yourself, how do I prepare my kitchen for a renovation? This step is the least fun out of all but it is truly the most important if you are painting your existing cabinets as part of the renovation. I have to remind myself of this over and over whenever I am painting anything. Prep work is key! Don't rush it and definitely don't skip it. Ensuring your paint has a solid surface to adhere to will ensure you have a lasting finish. Depending if you are painting over painted kitchen cabinets, wood, or MDF will depend on your prep work steps. For this project, I needed to clean, fill holes, sand and prime.
I removed all of the cabinet doors, drawers and hardware to start the prep work before painting them.
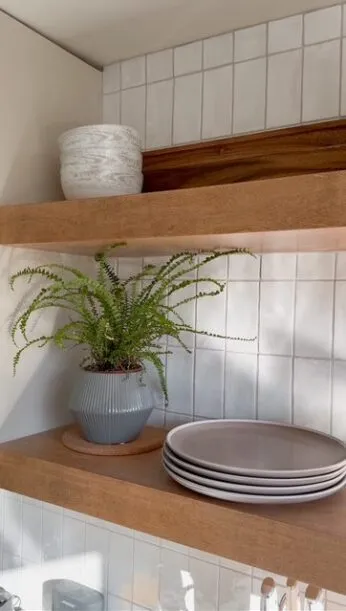
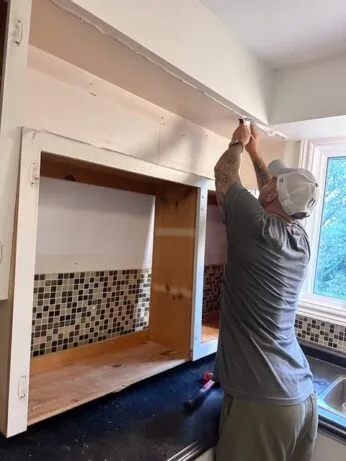
prep for installing floating shelves
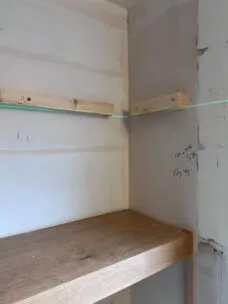
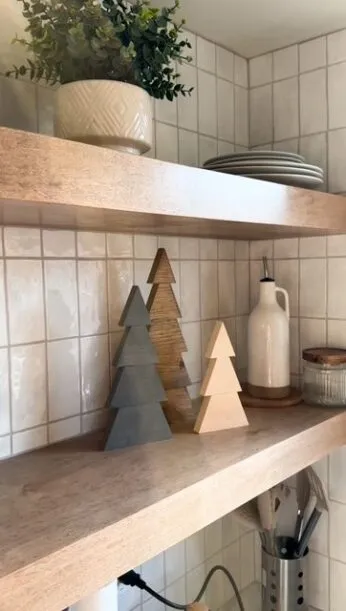
I wanted to modernize the space by adding floating shelves, so I removed a small section of upper cabinets. This sounds intimidating, but it was easier than expected. Cabinets are installed in sections, so we located the seam, cut into the caulking with a utility knife, and unscrewed the unit from the wall. Once removed, I painted the visible cabinet side that was once connected to the cabinet that was removed. I didn’t have to patch the wall behind it as we planned to tile all the way up the wall behind the floating shelves.
If you want to install floating shelves in your kitchen, take a look around and see where might make the most sense. It will look different for every kitchen. Maybe you put up a couple of short ones, maybe an L shape shelf, or like us we did two long shelves that ran from the cabinet to the wall.
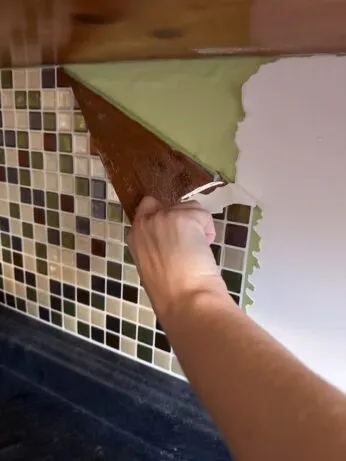
I also peeled off all of the peel-and-stick backsplash - this part was satisfying!
I did not remove the countertop, sink or faucet at this stage as I knew painting the cabinets and putting them back together would take a a few weekends or week nights so I left that until we were ready to swap them out!
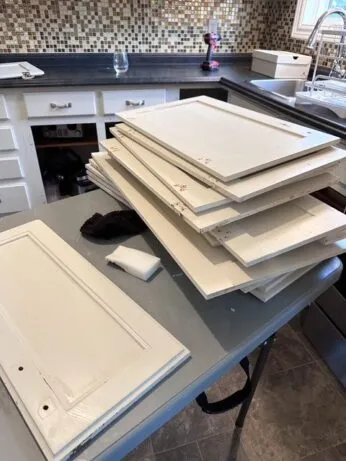
step 2: painting over painted kitchen cabinets and doors
painting inside of cabinets
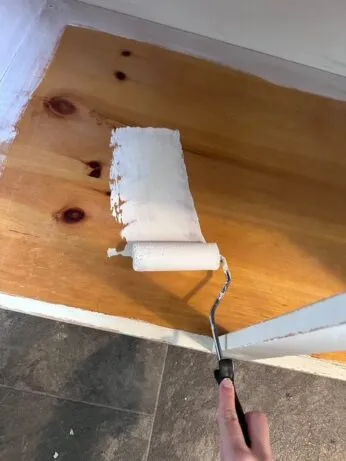
These cupboards are original from the 70's. Surprisingly they weren't in that bad of shape. They had a few marks and dings on them but nothing I couldn't cover up in the prep work. The inside of the cabinets was original pine wood from the '70s and had never been painted, so I applied two coats of BIN primer to block any wood knots from bleeding through the paint.
BIN primer is my go to product for painting cabinets or any furniture for that matter. It is a shellac base primer, it covers stains, smells, and pine knots like no other product! I highly recommend. For the cabinet exteriors, which had already been painted, Where I am painting over painted kitchen cabinets I had to confirm if they were painted with a water-base paint or oil-base paint. So upon investigation, I was able to determine they were painted with water-base paint which meant I just had to do a quick scuff sand to remove any flaking paint and give the surface some grit for the paint to adhere to.

painting outside of cabinets and doors
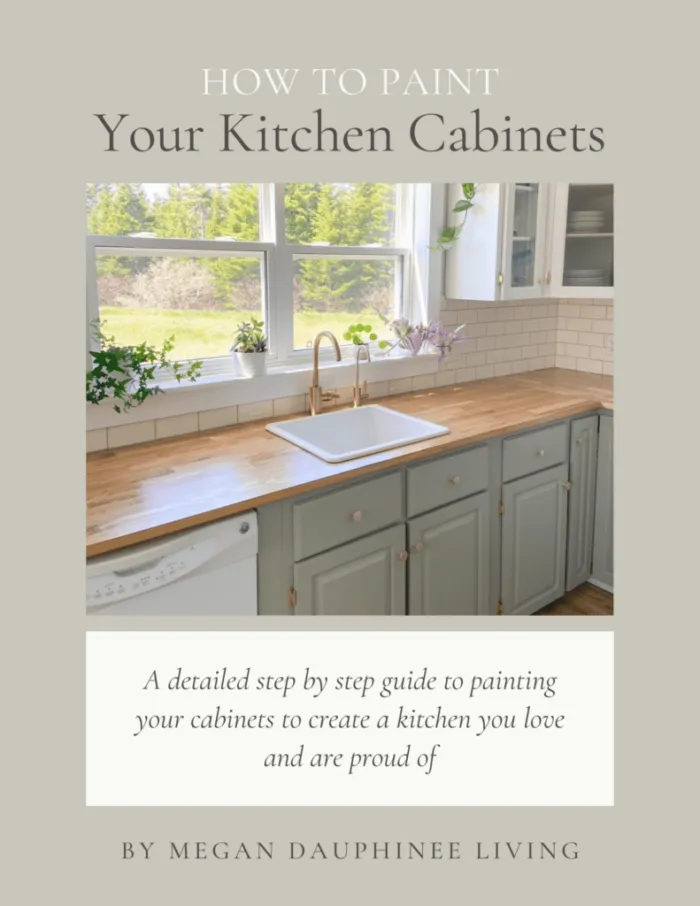
I used Sherwin Williams Enamel Cabinet and Trim Paint in Accessible Beige for the doors, drawers and frames, and Pure White for the inside of the cabinets. This paint is fantastic—Sherwin Williams Enamel Trim and Cabinet Paint is amazing because it delivers a smooth, professional finish with its self-leveling formula, making brush marks almost invisible- a win win for beginners! It’s durable, scratch-resistant, and perfect for high-traffic areas. Plus, it’s water-based for easy cleanup and offers exceptional adhesion and color options.
IMPORTANT TO NOTE: Your prep work, priming, and painting steps for your kitchen cabinets will depend on what you are painting. Are you cupboards MDF? Are they wood? Do they have a wax finish? Were they previously painted? If so, was it water-base or oil-base paint?
If you are feeling overwhelmed, not to worry! I have a created a detailed e-book to walk you through every step of the way to transform your kitchen cabinets. Details at the end of this blog post.

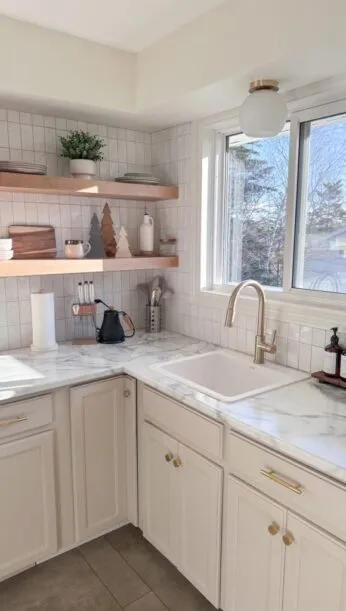
Cabinets after they were painted from painting over painted kitchen cabinets
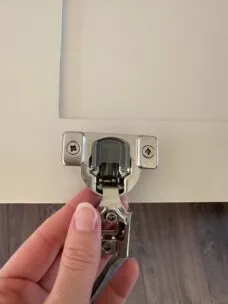
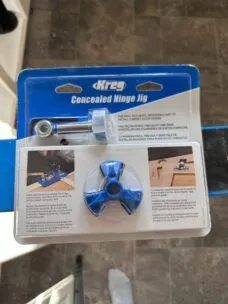
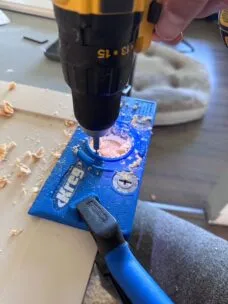
step 3: install new hidden hinges and hardware
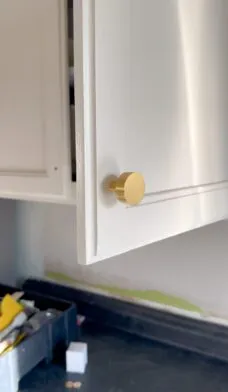
I opeted to install hidden hinges for a clean, modern look. Because my cabinets are face framing, I had to ensure I bought the appropriate type of hinges by measuring my overhang. Most cabinet doors are 1/2 or 1 and a 1/4 inch overhang. Mine were only 1/4 inch overhang. I ordered my hinges on Amazon and ordered this template which made drilling the holes on the back of the doors really easy. It was fool proof and provides a professional consistent install for each door.
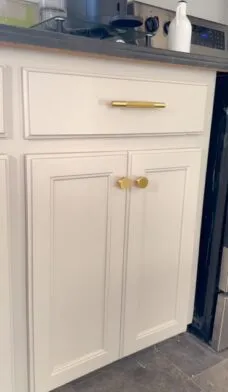
For hardware, I went with the Elsa knobs and pulls from Explore Hardware, which are beautifully designed and high-quality. They paired perfectly with the overall look of my kitchen. I really love their products and have their door handles installed throughout the rest of my home.

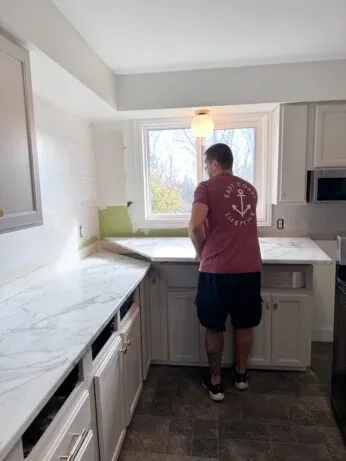
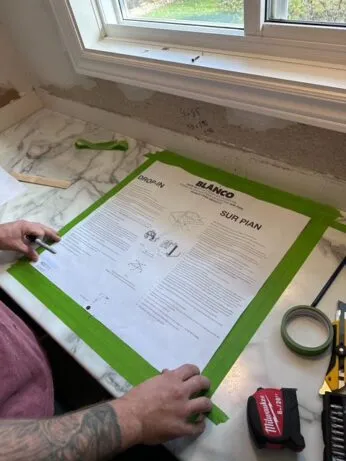
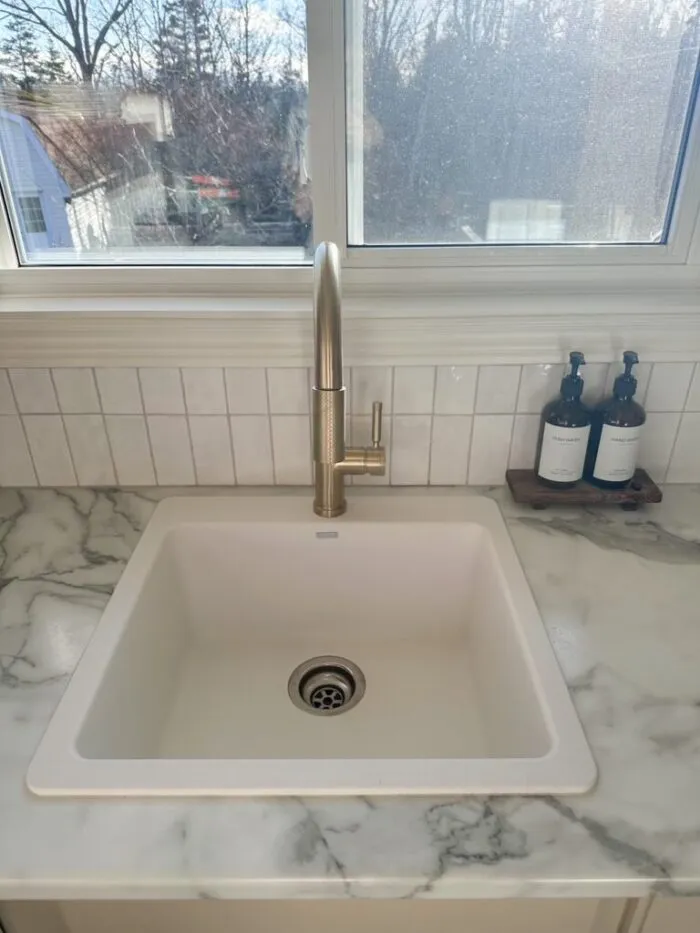
step 6: install new countertops, sink, and faucet
To keep costs low, I opted for laminate countertops. I went with Formica's Calacatta Marble. They look incredibly realistic and were a fraction of the price of real stone. If you are looking for a budget friendly option, I highly recommend! I paired the countertops with a white granite BLANCO sink, linked here on Wayfair and a gold faucet from Home Depot to compliment the hardware.
step 7: install floating shelves
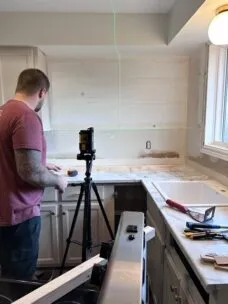
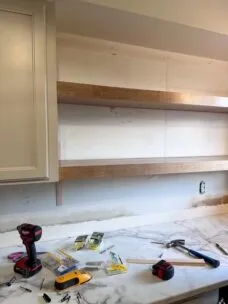
We installed the floating shelves so they were secure in the studs. It was recommended to us to install the shelves first and to tile around them. I had the shelves custom made by a local woodworking friend who is incredibly talented! If you are local in Halifax, NS area - check her out Nautical Home Designs. Using a laser level to install the shelves which made things super easy! We installed the brackets and then secured the shelves to the wall. We used some additional screws to ensure the shelves were secured to the brackets so that they will not move.
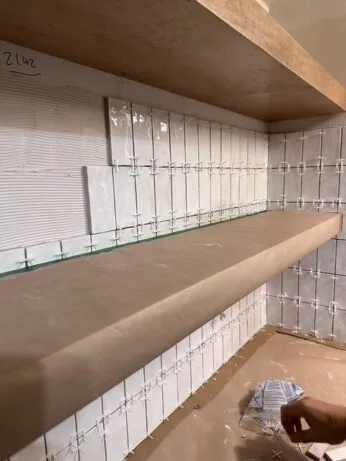
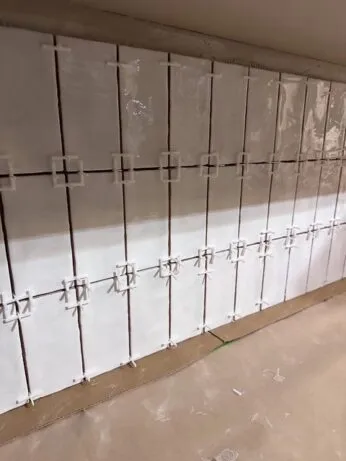
step 8: tiling the backsplash
Next up was tiling the backsplash. I found a tile I really liked from Stone Tile International, a Canadian company that sells tile and stone. I went with the Memorie in the colour Blanco Antico. It is white with subtle gray throughout. I opted to stack them vertically for a modern look. You may be wondering, what colour grout should I use for my backsplash tiling? I did the research and landed on warm gray for the grout. I highly recommend warm gray for your grout if you are between a white or gray. It won't get as dirty as a pure white will and its soft enough it blends nicely with a white/gray tile.
This step was a long process but totally worth it!
step 9: finishing touches
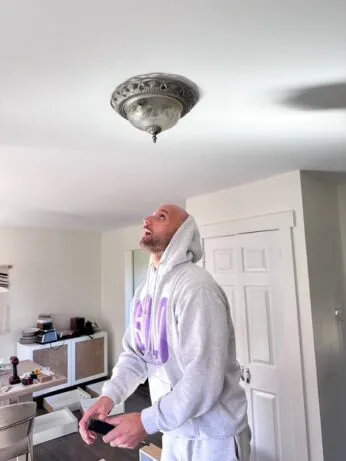
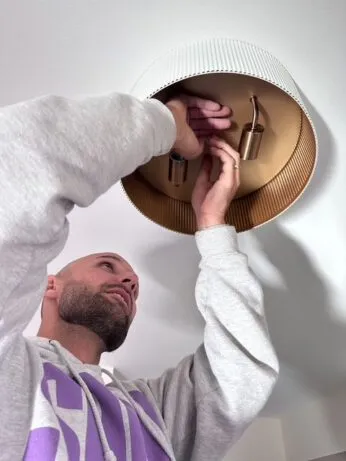
Finally, we installed new vinyl click flooring by Pergo in the colour Walrus. This durable flooring is warm taupe-gray and hides dog hair beautifully while blending seamlessly with the rest of our home’s laminate floors. For lighting, I added two new fixtures (it was so nice to see those boob lights go!) The light fixture being installed photo'd below was purchased from Kent (in Canada) linked here.
final look of painting over painted kitchen cabinets

cost breakdown in cad including tax
- Faucet: $240
- Countertops: $565
- Tile: $538
- Tiling Supplies: $85
- Shelves: $391
- Sink: $480
- Light Fixtures (x2): $166
- Cabinet Hardware: Gifted
- Paint: $200
- BIN Primer: $50
- Painting Supplies: $50
- Plumbing and Tile Spacers: $40
- Hinges: $150
- TOTAL: $2,955 CAD
I didn't include the flooring cost in this project as we purchased enough flooring to cover our kitchen, dining room, laundry room, bathroom and entryway! Total cost for the flooring we ordered was $2,200 CAD.
conclusion
So, if you are wondering, is it worth it to explore painting over painted kitchen cabinets? My answer is absolutely! It is such a cost effective way to make a huge impact. It can be a great way to upgrade your kitchen (and add equity to your home!). If you are only painting your cabinets it can cost no more than a couple hundred dollars!
This project was spread out over a few weekends and week nights and was completed within a month. If you are just looking to paint your cabinets you can get this done over a few nights or a couple of weekends at the most. The results are worth it. Do you need to be an experienced painter? Absolutely not! My first kitchen I did with no experience, and with a bit of research, it turned out beautifully. Check out that blog post where I transformed this kitchen on less than $1,600 CAD!
guide to paint your kitchen cabinets
Still unsure where to start when it comes to painting your kitchen cabinets?
Looking for a more detailed guide to walk you through step by step and cover everything from painting wood, laminate, or pre-painted cabinets?
I've created an e-book guide where I cover EVERYTHING to renovate a kitchen you'll love including the most common questions I get when it comes to painting your kitchen.
Like how do I know how to prep my cabinets for paint when they are already painted? How do I know if my cabinets are painted with water-base or oil-base paint? How do I paint over MDF? I go into detail on all of the tools and products I use, prep work depending on your type of cabinets, and techniques on how to prime and paint for a professional lasting finish.